Using Helpshift API's to Build Custom Support Solutions
A developer's overview of the Helpshift web API's
Helpshift provides you with a full set of integration APIs that allow you to automate, extend and customize your support solutions with Helpshift. These APIs provide an integration framework so that you can customize your support solutions for customers and Agents, automate your support workflows, analyze the information in your support system, or integrate any number of unique solutions into your support.
Overview
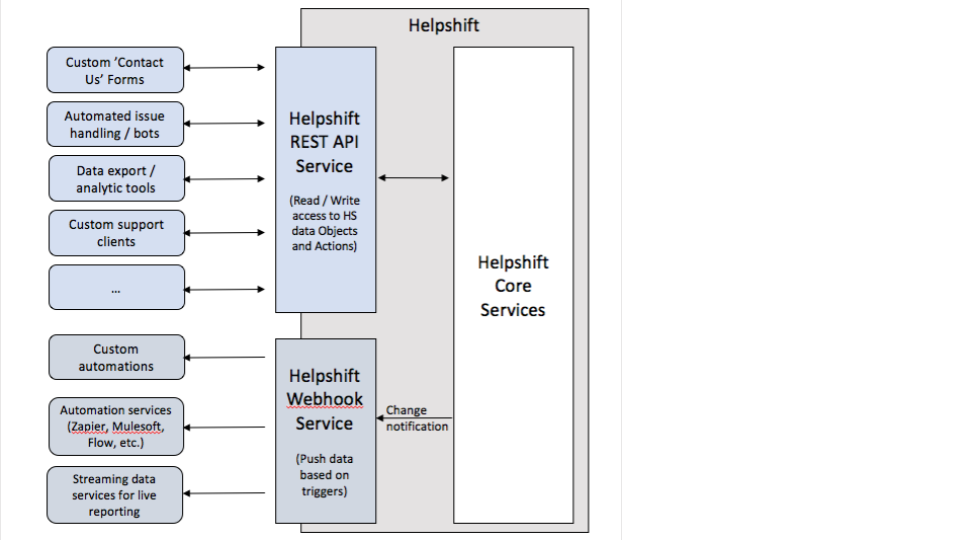
The Helpshift integration API is based on two main services:
- The REST API service which will enable read/write access into the core Helpshift objects, and access to perform Helpshift actions.
- The Webhook API service which can trigger Webhooks based on activity in Helpshift and push data into an external system.

These API's can enable a number of custom solutions, including the following common support customizations.
Web Based Custom 'Contact Us' Form
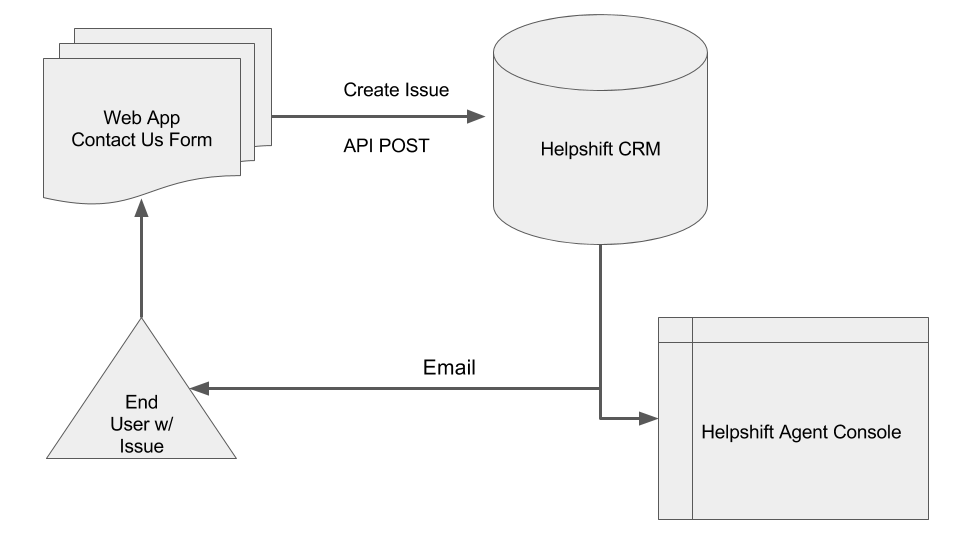
Use the Helpshift API to create issues programmatically from your web application. The create issue API is designed for customers seeking a flexible and customizable approach of filing web platform Issues outside of the Helpshift Agent Console. Using a Contact Us Form, your organization can capture custom metadata while generating an emailed ticket. If your company falls into any of these buckets, then this section may prove useful:
- You have web application and need a customer service solution
- Web is a major platform for incoming Issues for your business
- You want to collect as much metadata as possible on web Issues
- You have a logged in user experience on your website or web app
- You seek a customizable and bespoke customer service implementation goes beyond "out-of-the-box"
To better contextualize the flow for creating issues from a web form consider the diagram below.

Capturing custom data on a web form and passing it down to the CRM can be accomplished in a matter of moments. Collecting metadata ranging from the HS-tags to issues submitted via the web is easily accessed after said data has been passed into the Helpshift CRM. Once the metadata, issue and tag data have been captured you can begin to optimize workflows via routing issues to specific Smart Views or Agent Groups via Automations, all of which enables support teams to resolve customer queries or problems as quickly and efficiently as possible. In short, it grants all the power and functionality Helpshift provides for in-app Issues to Issues created via the web.
With robust permissions control, you can also require the user to be signed into your application prior to submitting an Issue. This allows you to collect crucial information such as their user ID, lifetime value, and more, which can be automatically attached to the Issue as metadata or HS-tags. Your support team benefits from this as it protects them from receiving Issues with no contact information, and also provides helpful context about the user when they are assessing the query.
For logged in web experiences, you can also use the POST API Call to create an issue in the API to file web issues directly to Helpshift. Let's take a quick look at that process now.
As a reference tool, there is the API Docs which will provide a sandbox to explore, edit, change, create and retrieve issues and data from your domain's Helpshift CRM.
The basic API call looks like the following:
| Command | Request URL | Description |
|---|---|---|
| POST | https://api.helpshift.com/v1/ <domain> /issues | Creating a single issue with POST command. |
Example Response Body:
{
  "created_at": 1502217904515,
  "id": "20",
  "title": "We hear you! Give us 1-2 hours to reply!",
  "tags": ["b2c", "technical"],
  "meta": {}
}
There are two required parameters when creating an issue:
email(the email address of the issue author)message-body(the body of the issue message to be posted).
The rest are all optional parameters, details of which can be found at API Docs
Getting started is relatively easy. First, map out the strategy for your web form to ensure the Helpshift API fits your requirements. Please note that the API can be integrated to require user authentication in the app prior to being able to contact support, so only logged in users will have Issue filing capacity.
When integrating the API, your backend server will need to communicate with the Helpshift server to send API requests. To learn how to access your API key, see How Do I Access My Helpshift REST API Keys? You'll also need to estimate of RPM (Requests Per Minute) that your site will receive while on the Helpshift API. This is a subset of the number of Issues files per day from your website. There is currently no limit on the amount allowable by the Create Issue API. However, you'll need this information for your Account Manager to estimate the cost of this feature for your organization.
The API integration itself will only take a couple of days of your developers' time, at the most. Prior to having your developers start the integration, we recommend sitting down with your team to understand your web form to ensure the Create Issue API meets your requirements. Feel free to reach out to your contacts here at Helpshift for any sanity checks or best practices for your use case.
Please note that maintaining this implementation over time requires developer effort on your end as various parameters may or may not be added to or deleted from, the lifecycle of the API is subject to change as we construct new and imaginative approaches toward capturing and instrumenting customer service issues and workflows surrounding those issues. Developer teams can make a custom Issue filing form that leverages sophisticated segmentation to decide which group of users need to file issues or what data to gather and pass along with specific types of issues or types of users. We recommend communicating with your developer team to plan for continued developer support and resources to maintain your implementation.
Export Issues to a CSV
Users needing the ability to export API output in a manner that is convenient to consume should review the following documentation.
Exporting the results from a search operation or query for a set of issues in CSV format, enabling you to access the data by using Microsoft Excel or other spreadsheet and database applications. A basic format to follow when seeking to extract data from your Helpshift instance is framed by the following:
Determine Filters.
- Visit your Admin section of the Helpshift Console to review available feature data that is desired.
- In addition, visit the HS API Docs and Documentation Overview to determine which filters you will be implementing. There are many to choose from and each will produce a very specific slice on the type, quantity, and details of the pull request.
GET Operations.
- Determine the appropriate GET call. Reference the GET Issues Scenario.
- Pass the necessary filters into your request. Reference Advanced Filtering Scenario.
- Ensure to extract all output by looping over the API output from multiple pages. Reference Pagination Scenario.
Convert JSON
- Know your JSON Object. Use API Docs tool to view the entire JSON object for a particular GET operation and HTTP Endpoint. Reference the API Overview Documentation.
- Make any adjustments or edits to the headers, columns, or parsing logic facets in your script.
Write Output to File.
- Dump the output into a file with .csv format.
- Write and save file to disk on local machine or in a cloud repository.
Sample Scripts are available at our Github Repositories:
Java
helpshift-api/samples/java/src/main/java/com/helpshift/ExportIssuesToCsv.java
Python
helpshift-api/samples/python/export_issues_to_csv.py
Custom Service to Integrate with Slack
You can use Webhooks to create a custom Slack Integration. You can now post a message to a Slack Channel of your choice whenever a new issue or any issue update occurs inside Helpshift.
We have documented a Step by Step Guide to have you setup a Slack Integration at our Webhook Samples Repo
Custom Service to Integrate with JIRA
You can use Webhooks to create a custom JIRA Integration. You can create a new JIRA ticket corresponding to new issues created in Helpshift, also keep these tickets in sync. A JIRA ticket is created for each new issue in Helpshift, and for each issue update, the JIRA ticket is updated accordingly. This includes -
- status updates - including mapping Helpshift status updates to the matching JIRA statuses
- tag updates - mapped to labels in JIRA
- new messages - added as comments to the JIRA ticket
We have documented a Step by Step Guide to have you setup a JIRA Integration at our Webhook Samples Repo